

Diagnostic Software for VW-Audi Group Cars

(Click the tabs in the picture above -- simulation will only work if you have JavaScript enabled)
Port and Protocol Options
Select Port
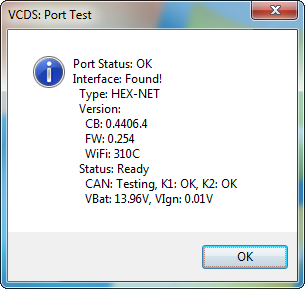
Set the COM Port to which you have connected the Interface Adapter. Serial Ports should be assigned to COM1 through COM4 (most often COM1 by default) while USB has only its eponymous choice. Make sure the ignition is turned on and the interface plugged into the vehicle, then click [Test] to see if VCDS can find the interface:
| Interface Name | Expected Test Result |
|
HEX-NET HEX-V2 |
CAN: Testing or OK K1: OK K2: OK Vbat: The unswitched power to the DLC. VIgn: The switched power to the DLC. |
|
HEX-USB+CAN HEX-COM+CAN |
K1: OK K2: OK CAN: OK (when tested on a car with CAN) CAN: Not Ready (on cars w/o CAN) |
|
KII-USB KEY-USB KEY-COM HEX-USB HEX-COM |
K1: OK K2: OK CAN: Not Supported |
| Micro-CAN |
K1: Not Supported K2: Not Supported CAN: OK (when tested on a Mk5-based car) |
If any of the results show "Short to Ground" or "Short to +12V" then you should test the port in the car using instructions found on the Aftermarket Radio Page.
On
Legacy Dongle Interfaces, the
[LEDs] button causes
the LED on the Interface to blink and may be useful for
testing a port's outputs for troubleshooting certain
connection issues.
On the HEX-NET or HEX-V2 the
[Config]
-
Start Baud is the first baud rate that VCDS will try when connecting to a controller. The current default value is 0. This means VCDS will determine the correct start baud on its own. With our current Interfaces, this field is unavailable.
-
KW2 Delay has to do with the amount of time used during the initialization of a session between the PC and the car. The current default value is 30. Do not change this value from the default unless you are having difficulties communicating with a particular controller. Contact us for advice if you are.
-
TST Addr. has to do with the packet addresses used by KWP-2000. The current default value is -1. Do not change this value from the default unless you are having difficulties communicating with a particular controller. Contact us for advice if you are.
-
Debug Level controls how much debugging information VCDS records. A zero in this field (the default) means NO debug output will be generated whatsoever. This should decrease VCDS's susceptibility to interference by things like virus scanners (except when logging data). There should be no reason to set Debug to anything other than zero unless you are instructed to do so by Ross-Tech.
-
Blk Int affects the protocol timing. The current default value is 55. To get the highest sample rate possible in the Measuring Blocks screen, set this to 25. Note, however, that this may cause unreliable communications with some controllers.
-
Char lnt 2K / Char Int also affects the protocol timing. This is called Char Int 2K and the default value is 6 when used with a HEX-NET or HEX-V2. This is called Char Int and the default value is 1 when used with a legacy interface. To get the highest sample rate possible in the Measuring Blocks screen, set this to 0. Note, however, that this may cause unreliable communications with some controllers.
-
KP2 Time only applies to controllers using the KWP-2000 protocol. The current default value is 25. Decreasing it increases the sample rate in Measuring Blocks on control modules that use the KWP-2000 protocols. The default value should work for all applications, but if it does not, you can always increase it again (to a maximum of 99).
-
CAN Timeout defines how much longer than normal VCDS is going to wait for the module to respond to a given message. Do not change this value from the default value of zero unless you are having difficulties communicating with a particular controller. Contact us for advice if you are.
Init
Parameters
should not normally be changed. If you encounter communication problems,
set them back to their default values as explained below:
Bypass OBD-II Fastinit should
only be checked if you are experiencing difficulty connecting to a
vehicle using generic OBD-II. The default state for this box is
unchecked. Force
K on Engine is used on Engine controllers that have a choice of
using CAN-Bus or k-line for diagnostics, such as the Mk5 Jetta 2.5l. This feature can be useful since the K-line often
delivers faster sample rates while datalogging than does the CAN-Bus
on modules that support both. Since some modules talk only via CAN,
this box is unchecked by default.
Bypass
CAN Init should only be
checked if you do not want VCDS to try connecting to vehicles
using the CAN-Bus. The default state for this box is unchecked.
Boot in intelligent mode allows
VCDS to quickly determine baud rates when using a HEX interface. If
you wish to try using your Ross-Tech dongle interface with 3rd party
software (which is not supported by Ross-Tech), you may want to run
a Test, then uncheck
Boot in intelligent mode then run another Test. This
will cause the interface to behave like an older style dumb
interface and will not be
compatible with most 6J Ibizas and it will be noticeable slower
building the list of installed modules on the Select Control Module
screen.
The default state for this box is
checked. With some of the newest interfaces, this may be labeled as Forced Dumb Mode and is UNchecked by default. The HEX-NET and HEX-V2 do not have this option since they don't support "dumb mode" or 3rd party software.
Reduce CPU Usage
checkboxes will greatly increase responsiveness of other apps running
at the same time as VCDS. The disadvantage is a somewhat reduced
sample rate. KWP-1281:
The default state for this box is unchecked. This reduces CPU usage when connected
to controllers using KWP-1281. Using this feature *may* make the
session with some control modules unreliable. KWP-2000:
The default state for this box is unchecked. This reduces CPU usage when connected
to controllers using KWP-2000 [Restore
Defaults]
will reset all Protocol Options (except
WorkShop Code and VZ/Importer number) to their "as-delivered" settings.
If you
right-click on the VCDS icon on the top left of the VCDS
screen, you can select �Delete config file and close�.
This can be very handy, especially if you have made the
window size too large.
User Interface and Identification
Workshop Identification
Shop Name
is displayed on reports, such as the
Fault Code Report.
The WorkShop Code
(known as the WSC) is found on the Admin screen of a dealer's
VAS-5051, as well as on the dealer's stamp. The default value is
00000. For example, using the stamp below, the dealer's number is
401/742. To derive the Work Shop Code, drop the first digit and use
the remaining digits in order.
So, Evergreen Terrace
Volkswagen has a WSC of 01742. This only applies to US VW dealers.
Canadian dealerships use a 4-digit number on their stamp. To find the
WSC, place a 9 before their number. Note: If you are an individual user or independent mechanic, just leave
the WorkShop Code set to "00000".
This allows VCDS to operate in �stealth� mode, keeping whatever WSC
that was already in the controller. If you are using VCDS at a
Dealership, enter your Dealer's Workshop Code. The Work Shop Code is not easily changed
once set on this screen. Contact us for advice if you need to do so. Some
control modules do not allow themselves to be Coded with the default
00000 WSC in place. VCDS should prompt you with a message to input
non-zero values in such cases. You should NOT make such changes in the
Options screen itself.
User Interface Left Margin
Printing
This is the number of spaces that printed pages are shifted to the
right. Window Size This function allows you to change
the apparent size of the VCDS window on your screen. Adjust this in
small increments since it is possible to make VCDS so large that it
is much bigger than your screen! To see the resizing take effect, click Save, then close VCDS. When you restart, the new window size
should be shown. A video demonstrating this feature can be found at the bottom of this page.
Disable Sounds
Checking this box will prevent VCDS
from making sounds when an operation is complete, for example at the
end of an AutoScan or at the end of Acceleration Measurements. This
will not prevent Windows sounds when an error message pops up.
Prevent screen power savings while communicating
Checking this box will tell Windows
to not turn off the screen during a diagnostic session.
Build list of CAN
controllers prior to selection dialog
This box is checked by default.
In
CAN based cars
that have a proper Gateway supporting an Installation List, VCDS
will automatically populate one or more Installed tabs
containing buttons for only those control modules that are actually
installed in the car. It does take about 1.5 seconds to get the list
from the Gateway, so a bit of a delay when clicking
[Select]
is normal/expected. Customers who use VCDS primarily on older cars
which do not have an Installation List available may want to uncheck
this box.
Check for free updates
If
an internet connection is available, VCDS will notify the user
when updates are available and will ask permission to download and
install updates.
Because we do not want to burden customers' PCs with a resource
hogging update scheduler, VCDS will only check for updates when
it is started and when the PC is rebooted. We've
tried to make this as unobtrusive as possible -- VCDS will not
complain if there's no internet connection available -- you just
won't get updates.
Select from the drop-down menu to
determine if, and when VCDS should automatically check for updates
when the program starts. You can also click the
[Check for updates now]
button to manually initiate a check.
[Save]
causes the current options to be stored. Note that until you have Saved
your preferences, all buttons on the VCDS Main Screen will be
grayed-out except Options. [Apply]
lets you use and test the options without storing them. The next time
you restart
VCDS, the options previously stored will be used. [Cancel]
takes you back to the Main
Screen without any effect.

Note:
If you are an individual user or independent mechanic, just leave
the VZ/Importer number set to "000". This allows VCDS to operate in
�stealth� mode, keeping Importer number that was already in the
controller. If you are using VCDS at a Dealership, enter your
Dealer's VZ/Importer
number. The VZ/Importer number is not easily changed
once set on this screen. Contact us for advice if you need to do so.
Some
control modules do not allow themselves to be Coded with the default
000 Importer number in place. VCDS should prompt you with a message to
input non-zero values in such cases. You should NOT make such changes
in the Options screen itself.
Some
control modules do not allow themselves to be Coded with the default
00000 Equipment number in place. VCDS should prompt you with a message
to input non-zero values in such cases. You should NOT make such
changes in the Options screen itself.
Note: Some 3rd-party firewall software may complain
that VCDS is trying to access the internet -- if this happens you
should either tell the firewall to allow it, or turn off
Automatic Updates.
Unless otherwise noted, all content on this site is Copyright (c) 2000-2021 by Ross-Tech LLC. All rights reserved.
"VCDS", "VCDS-Mobile" and "HEX-NET" are Registered Trademarks of Ross-Tech, LLC.
Ross-Tech is not affiliated with the Volkswagen Group in any way.